How to Use React Hook Form with TypeScript
Handling form inputs are an absolute necessity for any modern web application. React is no exception. We can handle form in multiple ways. But ensuring re-usability and performance is especially critical for forms.
Because forms are some of the most dynamic components and if you handle it incorrectly your users will feel the pain of using a sluggish application.
Today we will look into an awesome library named react-hook-form which enables us to create clean and performant form components.
But what about other solutions?
Good question. There are other libraries like Formik and Redux Form doing almost the same thing in a different approach. But, React hook form is better in several ways.
Less Boilerplate
Less Rendering compared to others
Better support for Schema Validation.
What are we going to build?
Today we will build a simple authentication form where a user will be able to
Give
EmailandPasswordas inputWill have
validationfor filtering data.
We will start simple and see how we can progress step by step.
Step 1. Install Dependencies
Let’s first install dependencies
yarn add react-hook-formStep 2. Import Hook
Import the the useForm hook from the library. This hook exports all the necessary controls for our form.
import { useForm } from "react-hook-form";Step 3. Define Interface for our data
As we are using TypeScript we should take advantage of the type system. The best part is it catches the error at compile time if you have any typos.
type Inputs = {
  email: string
  password: string
}
Step 4. Build the Form
Following is the complete code for our form. Here we are extracting two controls from the hook.
register -> This is necessary for binding our form inputs to the library.
handleSubmit -> This is the standard submit function.
import React from 'react'
import { useForm } from 'react-hook-form'

type Inputs = {
    email: string
    password: string
}

export default function FormSignUp() {
    const { register, handleSubmit } = useForm<Inputs>()

    const onSubmit = (data) => console.log(data)

    return (
        <form onSubmit={handleSubmit(onSubmit)}>
            <input {...register('email')} />
            <input {...register('password')} />
            <input type='submit' />
        </form>
    )
}
Here one thing to note is we get the value as an object inside the onSubmit function. Like the following:

Step 5. Add a default value
Sometimes we want to add a default value in our form fields. In those scenarios, you can add the defaultValue property like the following
<input *defaultValue*='[email protected]' {...register('email')} />And now your form will look like this:

Step 6. Validation
A famous philosopher once said: “What are forms without validation?”
So now we will see how we can add validation in our form. There are several validations available for us out of the box
required(make a field mandatory)min(for numbers)max(for numbers)minLength(for the length of the field)maxLength(for the length of the field)pattern(for pattern matching like valid password/email)
You can read more about them here
Now we will make sure that our users just give input of their email and the password must be 6 characters long.
<form onSubmit={handleSubmit(onSubmit)}>
  <input {...register('email', { required: true })} />
  <input {...register('password', { minLength: 6 })} />
</form>
Okay, we have made the field mandatory but how do we catch the error? For that, we need to import errors from inside the hook
const {register,handleSubmit,*formState*: {errors}} =useForm<*Inputs*()Finally, our form looks something like this
import React from 'react'
import { useForm } from 'react-hook-form'

type Inputs = {
    email: string
    password: string
}

export default function FormSignUp() {
    const {register,handleSubmit,formState: { errors }} = useForm<Inputs>()

    const onSubmit = (data) => console.log(data)

    return (
        <form onSubmit={handleSubmit(onSubmit)}>
            <input {...register('email', { required: true })} />
            {errors.email && <span>This field is required</span>}
            <input {...register('password', { minLength: 6 })} />
            {errors.password && <span>This field must be 6 characters long</span>}
            <input type='submit' />
        </form>
    )
}
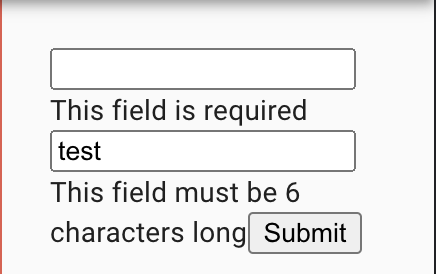
Now when you try to submit without the email filled up the errors will come up.

Step 7: Let’s clean up even more
I personally don’t like passing validation logic into the input itself. Also, the default control that we get is not that extensive.
In this scenarios we can use some kind of schema validation library like Yup which is really popular.
To use that what we first need to install the dependency
yarn add @hookform/resolvers yupThen build the schema validator.
import { yupResolver } from '@hookform/resolvers/yup'
import * as yup from 'yup'


const schema = yup.object().shape({
    email: yup.string().required(),
    password: yup.string().min(6)
})
and pass the schema into the useForm hook
const {register, handleSubmit,formState: { errors }} = useForm<Inputs>({
    resolver: yupResolver(schema)
})
Now our form will be a lot cleaner than before:
<form onSubmit={handleSubmit(onSubmit)}>
    <input {...register('email')} />
    {errors.email?.message}
    <input {...register('password')} />
    {errors.password?.message}
    <input type='submit' />
</form>
So now both our form and error handling becomes cleaner. and does the same job as before.

Conclusion
There you have it. We’ve seen how we can use the react-hook-form library to write clean and performant form components without the hassle of boilerplate. Have a great day!
Have something to say? Get in touch with me via LinkedIn

