How to Setup VPC on AWS
You have something hosted on AWS. You have seen the word VPC here and there.
Maybe you are like me and thinking what the heck is this VPC thing?
Well, you have come to the right place. Today we will learn all the basics about VPC(Virtual Private Cloud) and create one ourselves.
Along the way, you will learn some networking basics and also dig deep into AWS infrastructure!
First Things First, What is VPC?
A virtual private cloud can be thought of as a private network inside which all your aws resources will reside. Here resources can be anything from EC2 instance to Database.
Inside your private network, you are the boss. you can set what can be accessed from the outside world or what needs to be private.
Components of VPC
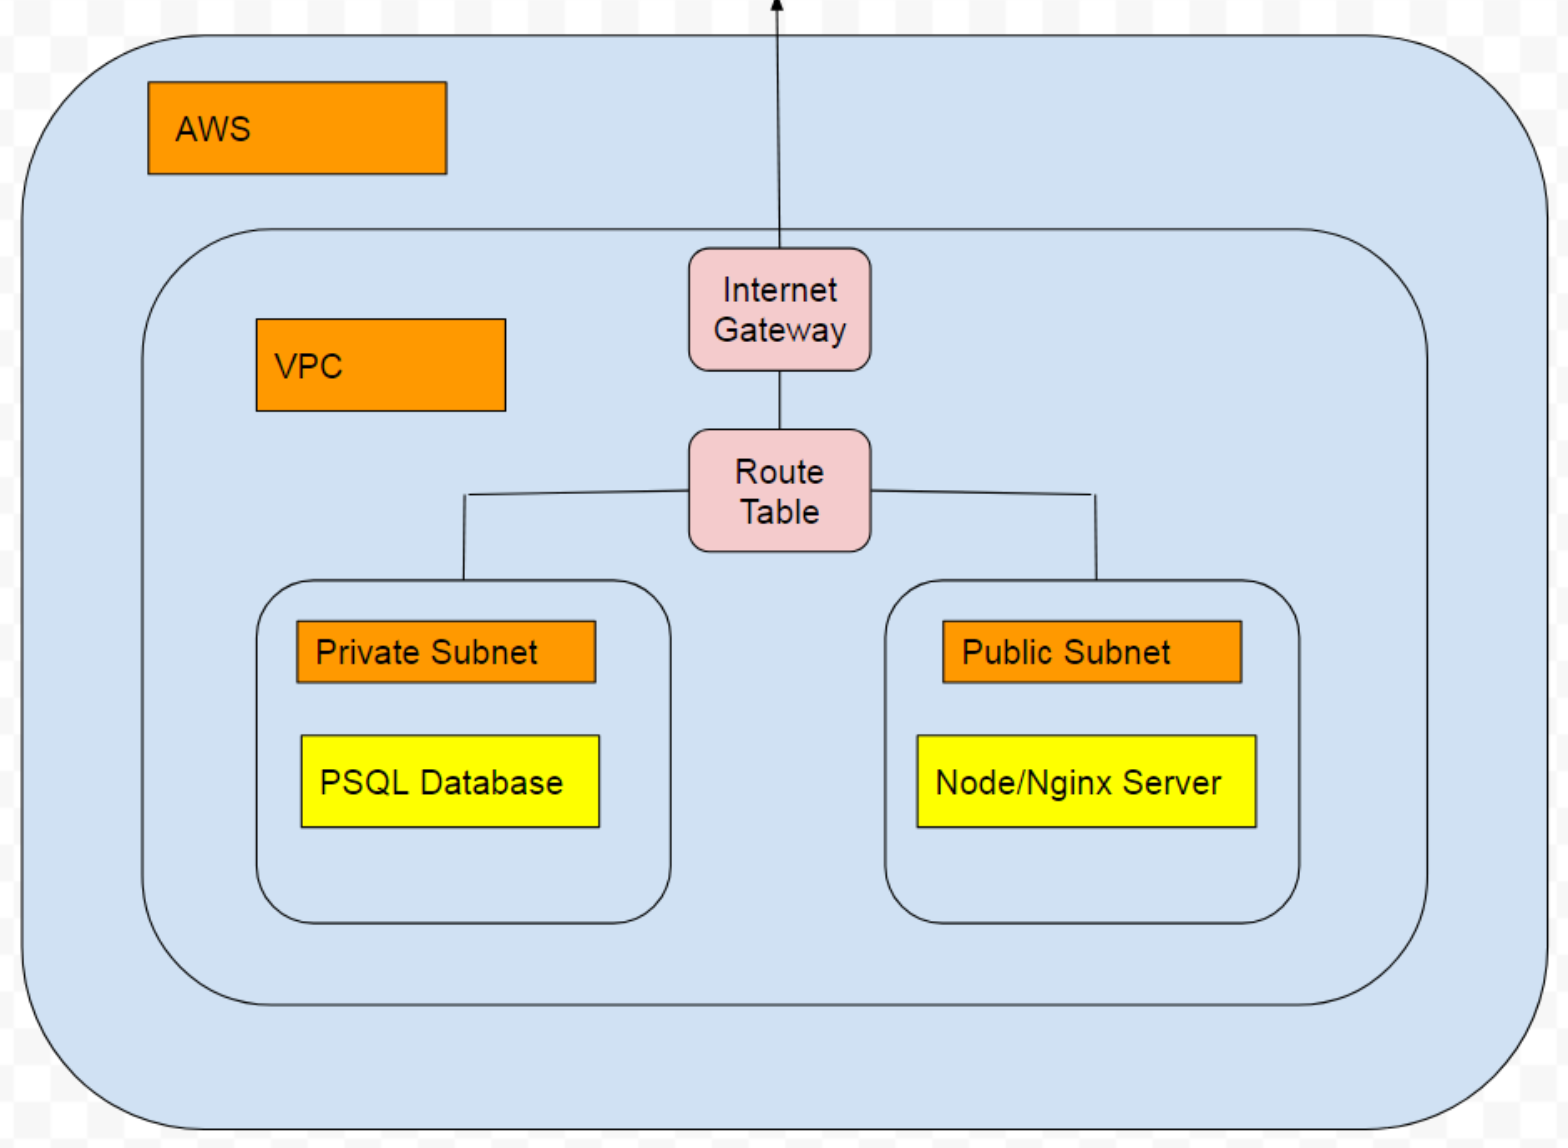
Subnet
Subnets are a way to divide your VPC. You can have some private subnets or some public subnets.
The private subnets will be only accessible from inside the VPC. for instance you don’t want your database to be accessible from anywhere. You want only your trusted applications(Like your backend application) to access that.
Speaking of which your web application can reside inside another subnet that will be public. Because general users will access that.
Each of your subnets will be assigned an auto-generated IP address.
Route Table
Route tables work as a router inside your VPC.
Whenever any resource inside your VPC tries to access another resource located in another IP, it checks the route-table first to see if it has proper permissions to access that resource.
Internet Gateway
The Internet gateway is the gateway to the internet as the name suggests.
Your VPC must have an internet gateway if you want your resources accessible from the internet.
That means the internet gateway will enable our end-users to access the secured resources inside our VPC.
Security Groups
Security groups are just rules who specify how your VPC is accessible.
There we can specify the Rule (TCP or HTTP Or Https or others ) and the port and the permitted resources that can access our VPC.
Now we will get our hands dirty with each of these. You will need an aws account to follow along. You will not be charged for anything we do in this tutorial.
Creating VPC
Go to your AWS console and search VPC. Go in that and click on Create VPC.
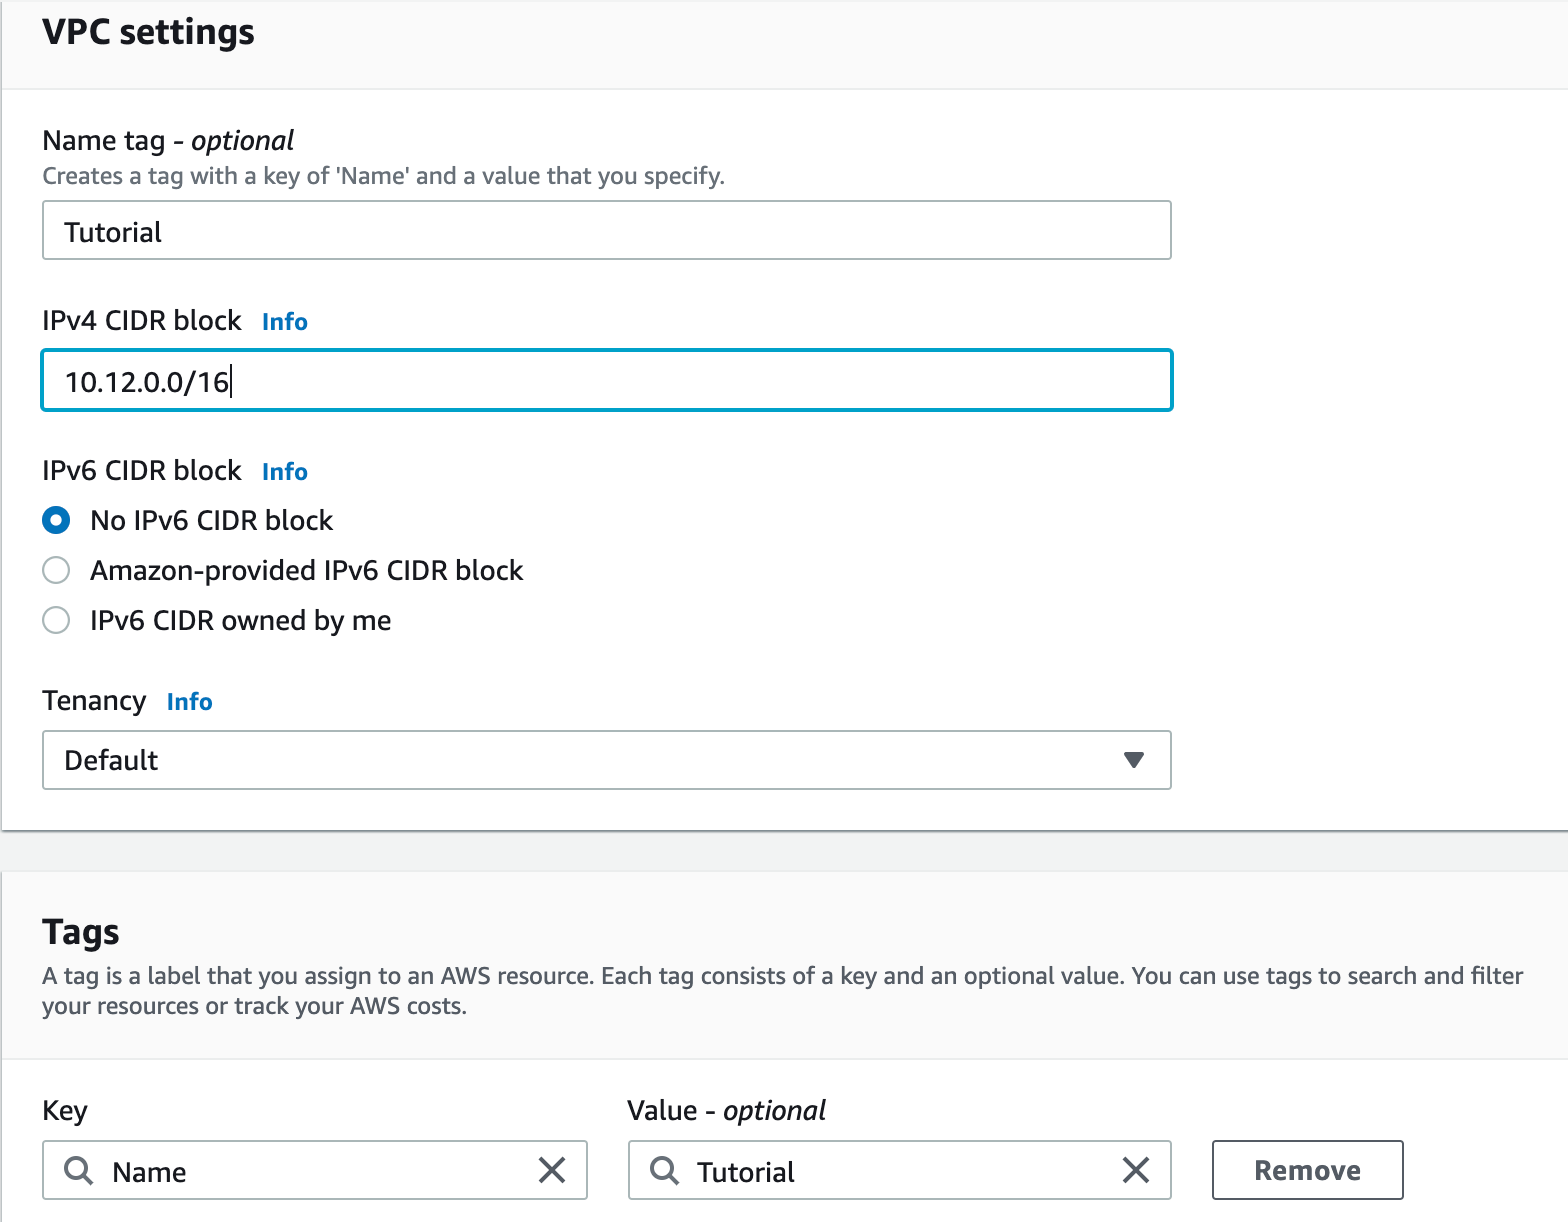
Here the IPv4 CIDR block is the important thing to note here. IPV4 address has a total of 4 bytes(8 bits) that are separated dots.
( ). ( ) . ( ) . ( ) (8 bits)
Each byte has 2⁸ or 256 possible values. values start from 0 so available values are 0–255.
So an address can be 0.10.34.125 or another can be 23.6.32.87.
The trailing /16 means the first 16 bits are for the network address. That means all addresses inside this VPC will start their address by using 10.12. (0–255). (0–255) . This is an important thing to keep in mind.
We keep everything else as default and click Create VPC and we are done.
Creating Subnets
Now go to the subnets section from the sidebar. We click Create Subnet
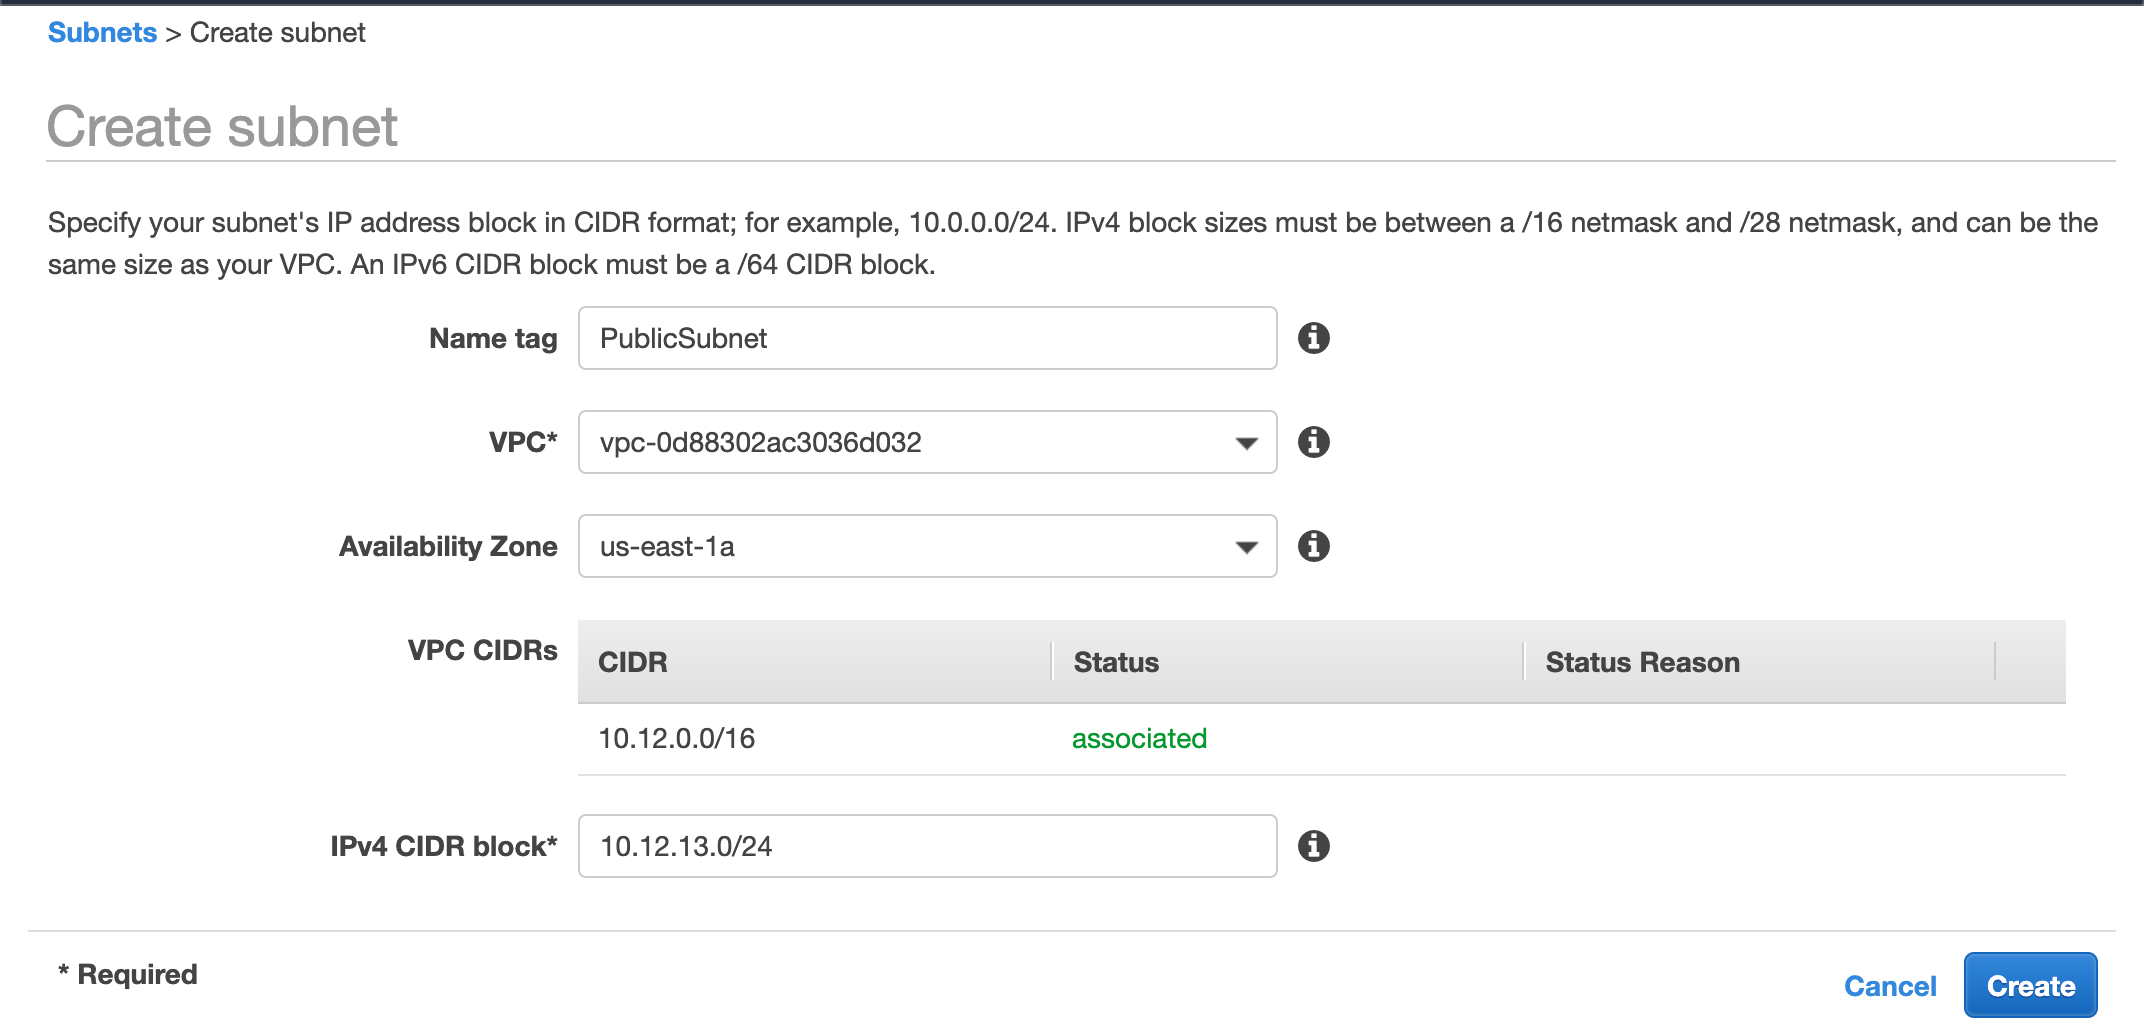
We will name this as PublicSubnet as we want this to be a public one (as discussed earlier).
We select our newly created VPC from the dropdown
Select an availability-zone. These are physical server locations. you choose as you like. > In some instances (Like creating RDS) you may need multiple subnets in different availability-zone.
We fill up the IPv4 CIDR block as 10.12.13.0/24
As we said earlier this subnet is residing inside our VPC whose IPv4 CIDR block started with 10.12. as a result, our subnet must prefix with the same value. For the third block, I chose 13. you may choose any value from 0 to 255.
And at the end, we added /24 which means all resources inside this subnet will have an IP address starting with 10.12.13 (total 24 bits fixed) only the last octet will change. So one possible IP address inside this subnet can be 10.12.13.43. AWS will automatically assign this.
One thing to note. we can put other values ( like /22 or / 23 )instead of /24. But for simplicity, we are going with /24 for now.
We will create another Subnet named Private Subnet in a similar fashion
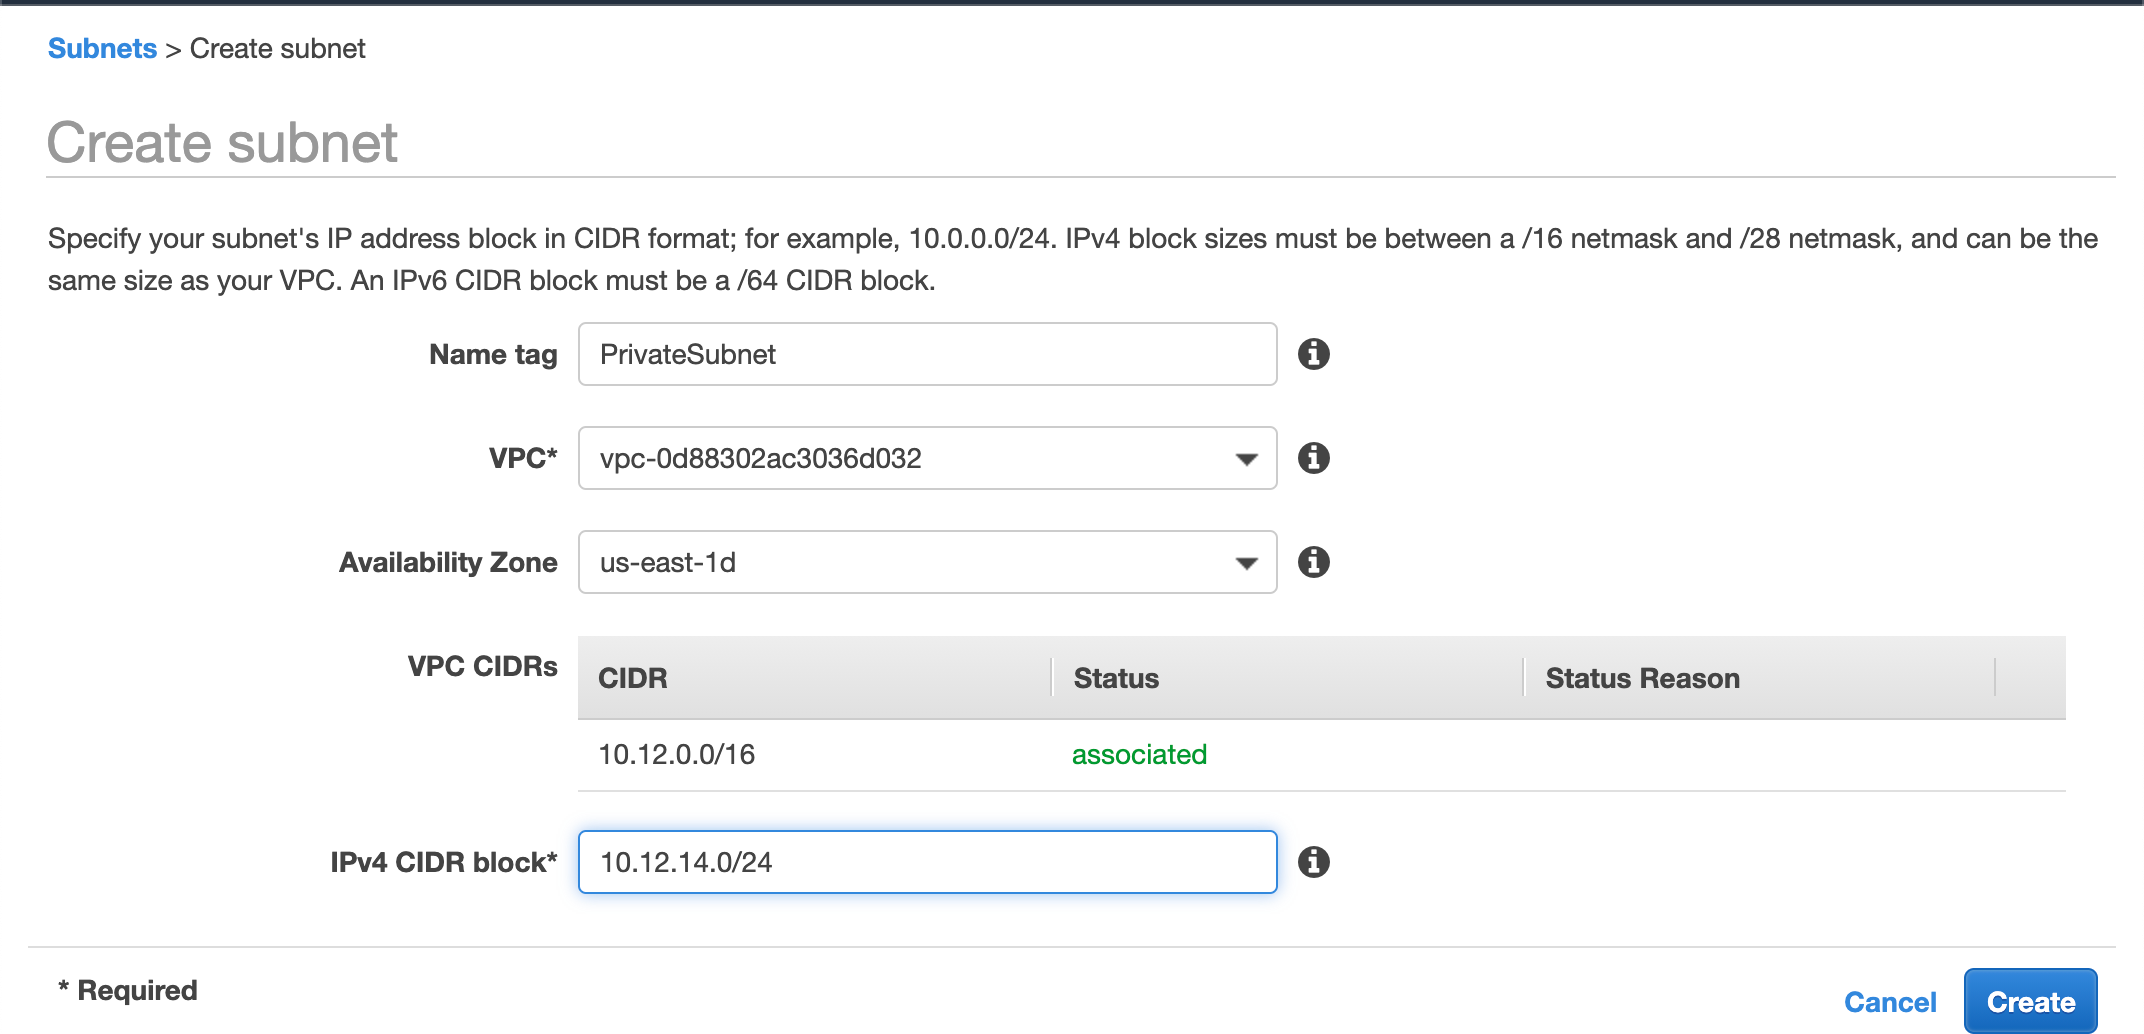
Now we have two subnets to work with. Let’s move on to creating an Internet Gateway.
Creating an Internet gateway
Open the Internet Gateway portion and click on Create Internet Gateway
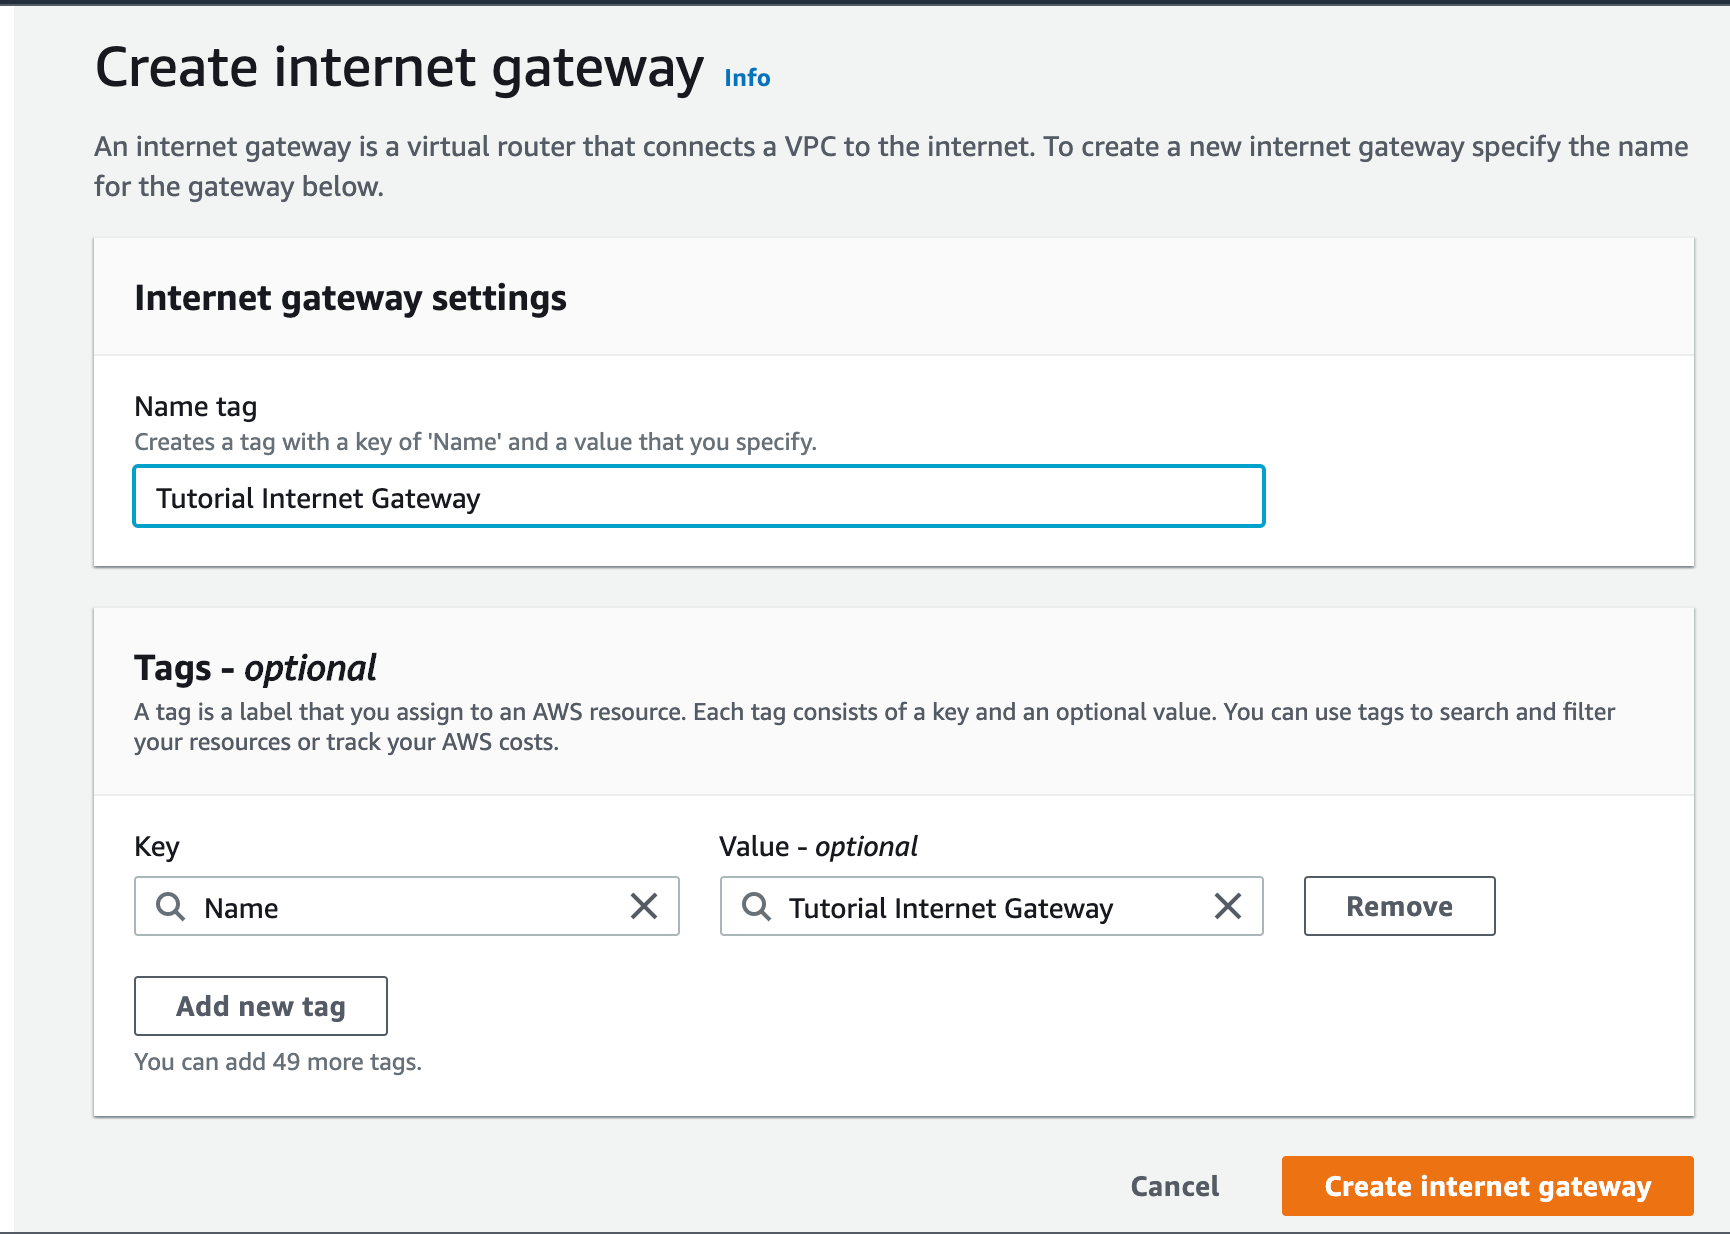
Give a name you like and you are done.
As we said earlier we need an internet gateway to enable our public subnets to communicate with the internet.
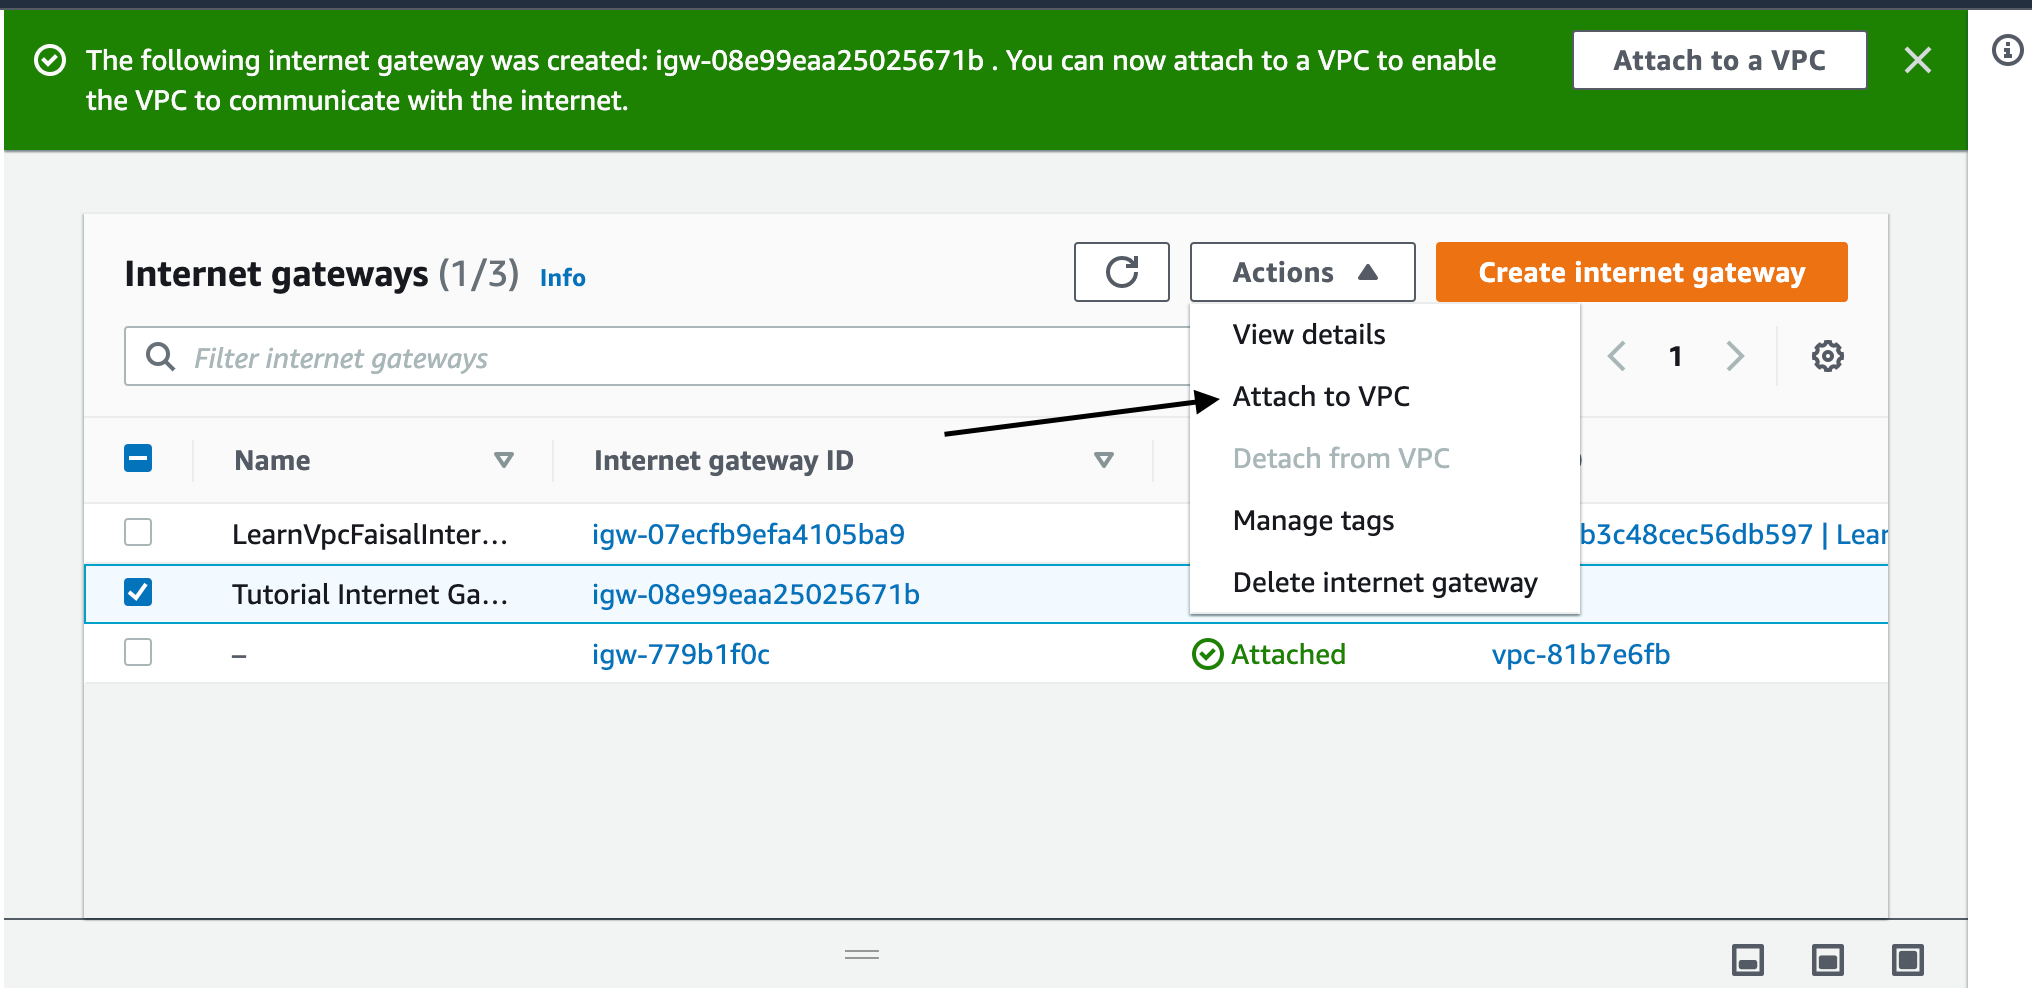
Now we have to attach this internet gateway to our VPC. Click on the Internet gateway from the list and from the actions menu select to attach to VPC
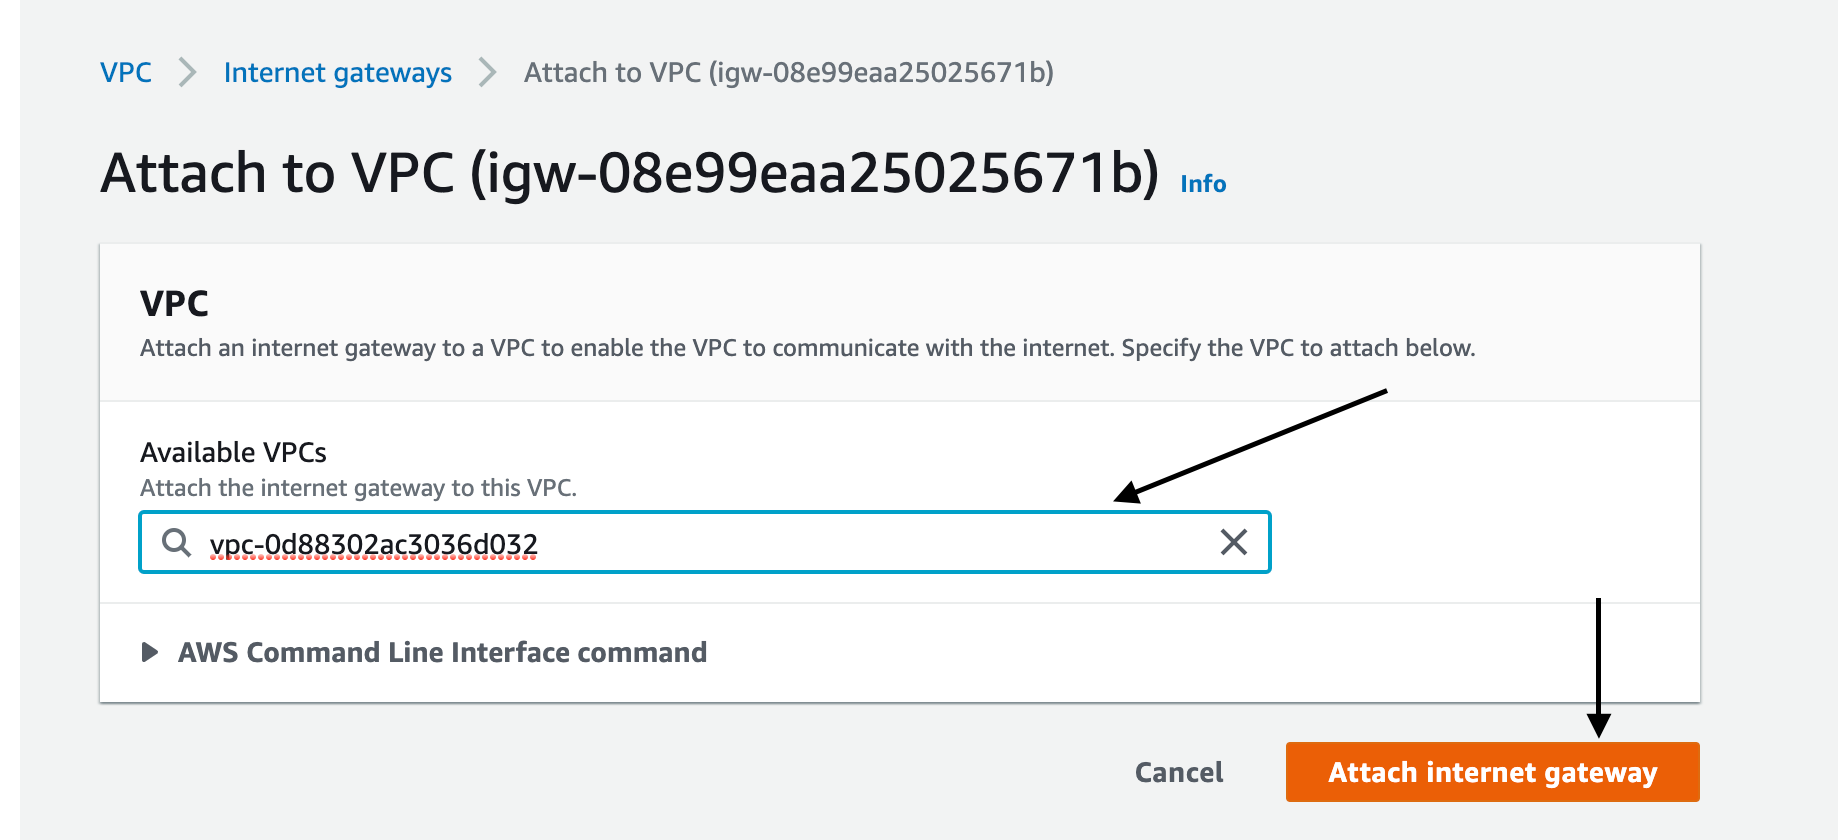
From the dropdown select our VPC and you are done. Now our Vpc can talk to the internet.
But we didn’t specify which subnets can talk to the internet. We will connect them now via the Route table.
Create a Route Table
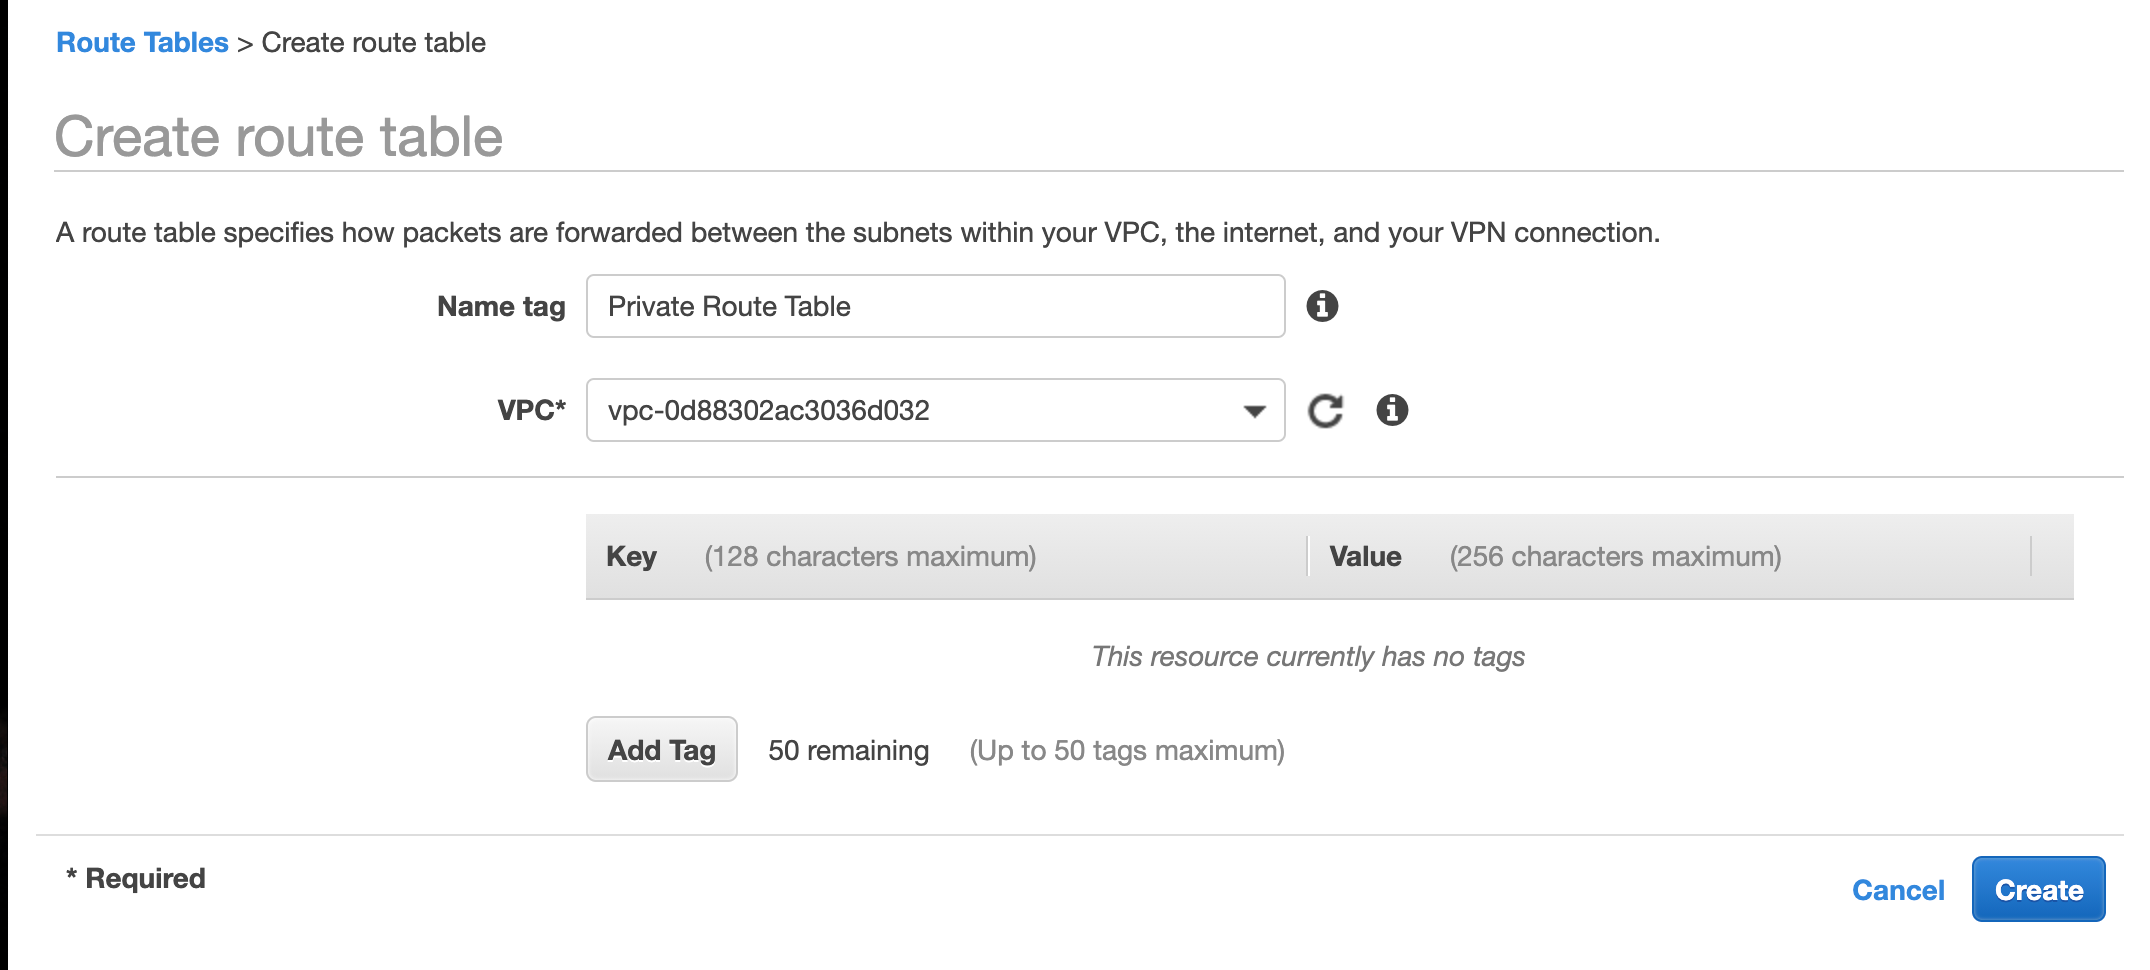
Now we select Route Tables from the sidebar and click on Create Route Table
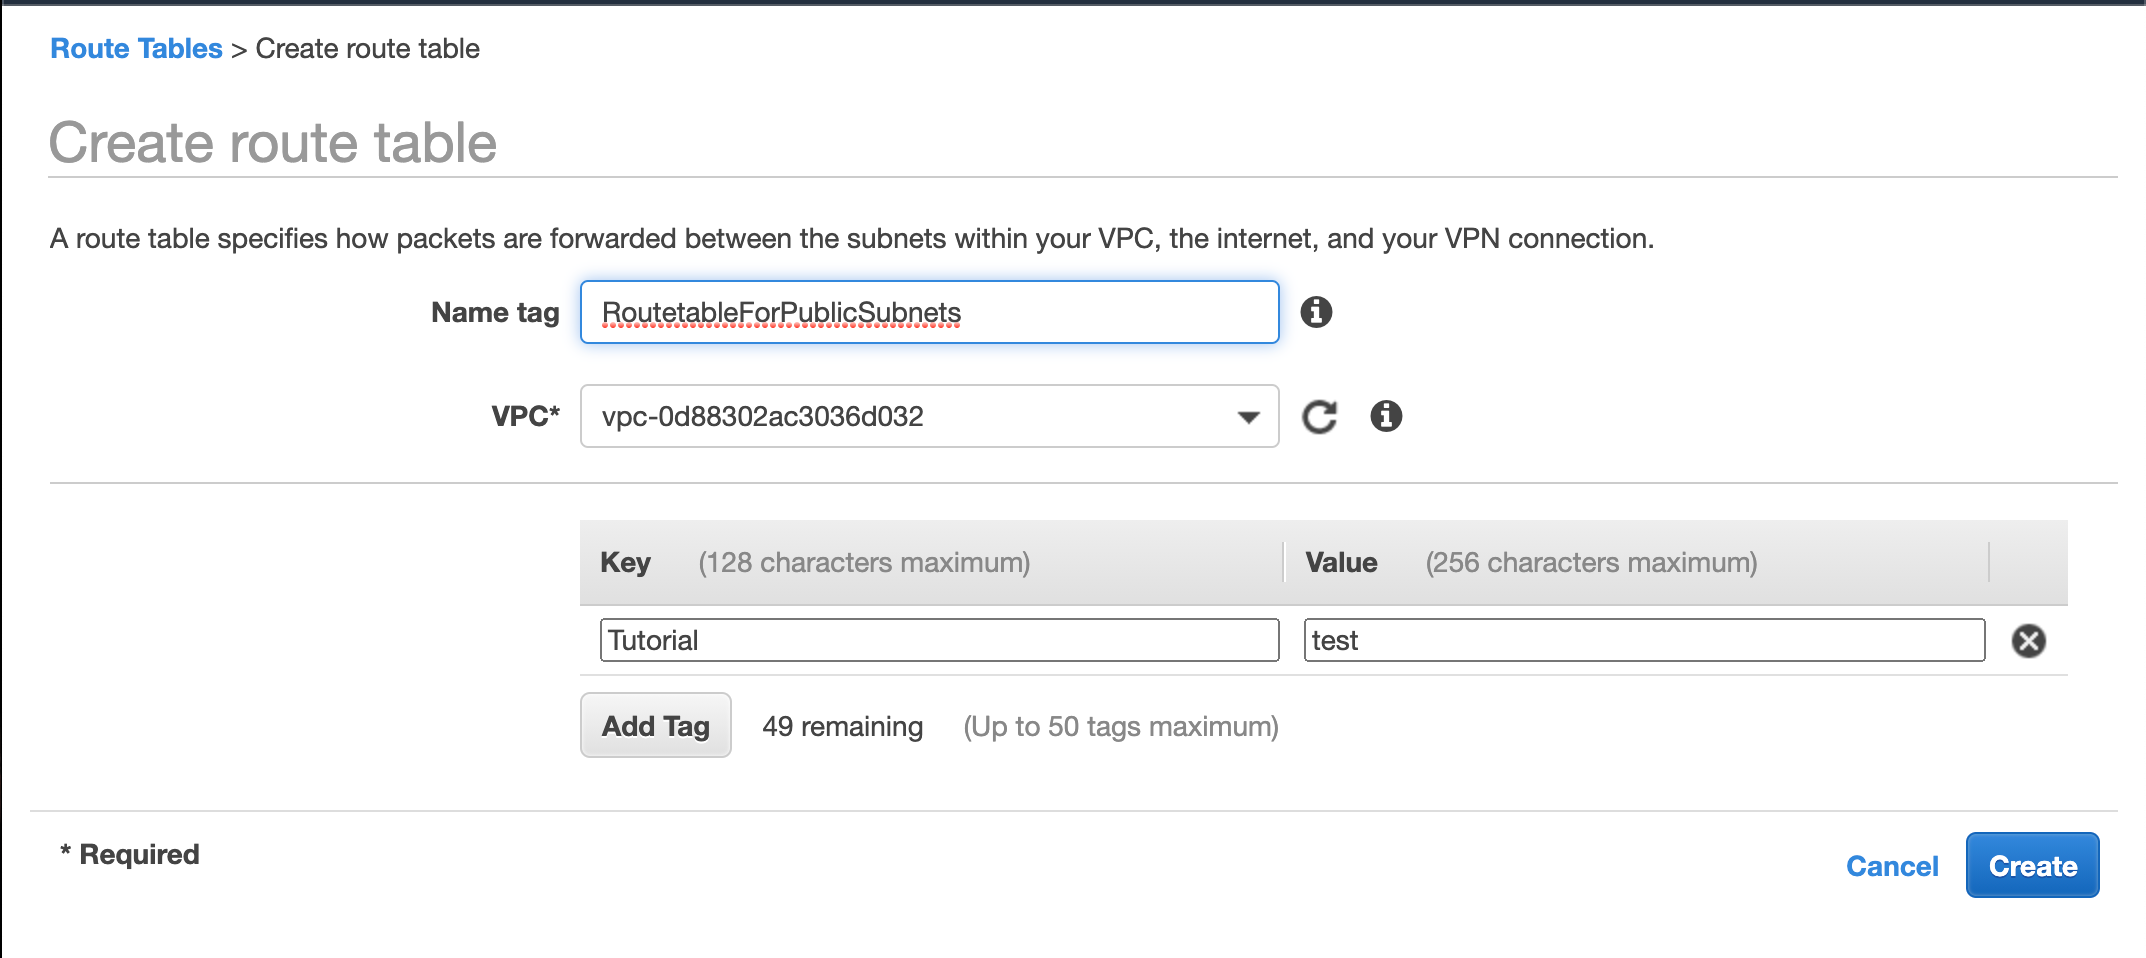
We will need two route tables. one for the public subnets and another for the private ones.
We give it a name.
Select our target VPC
Add a tag to identify it (not mandatory)
Hit create and done.
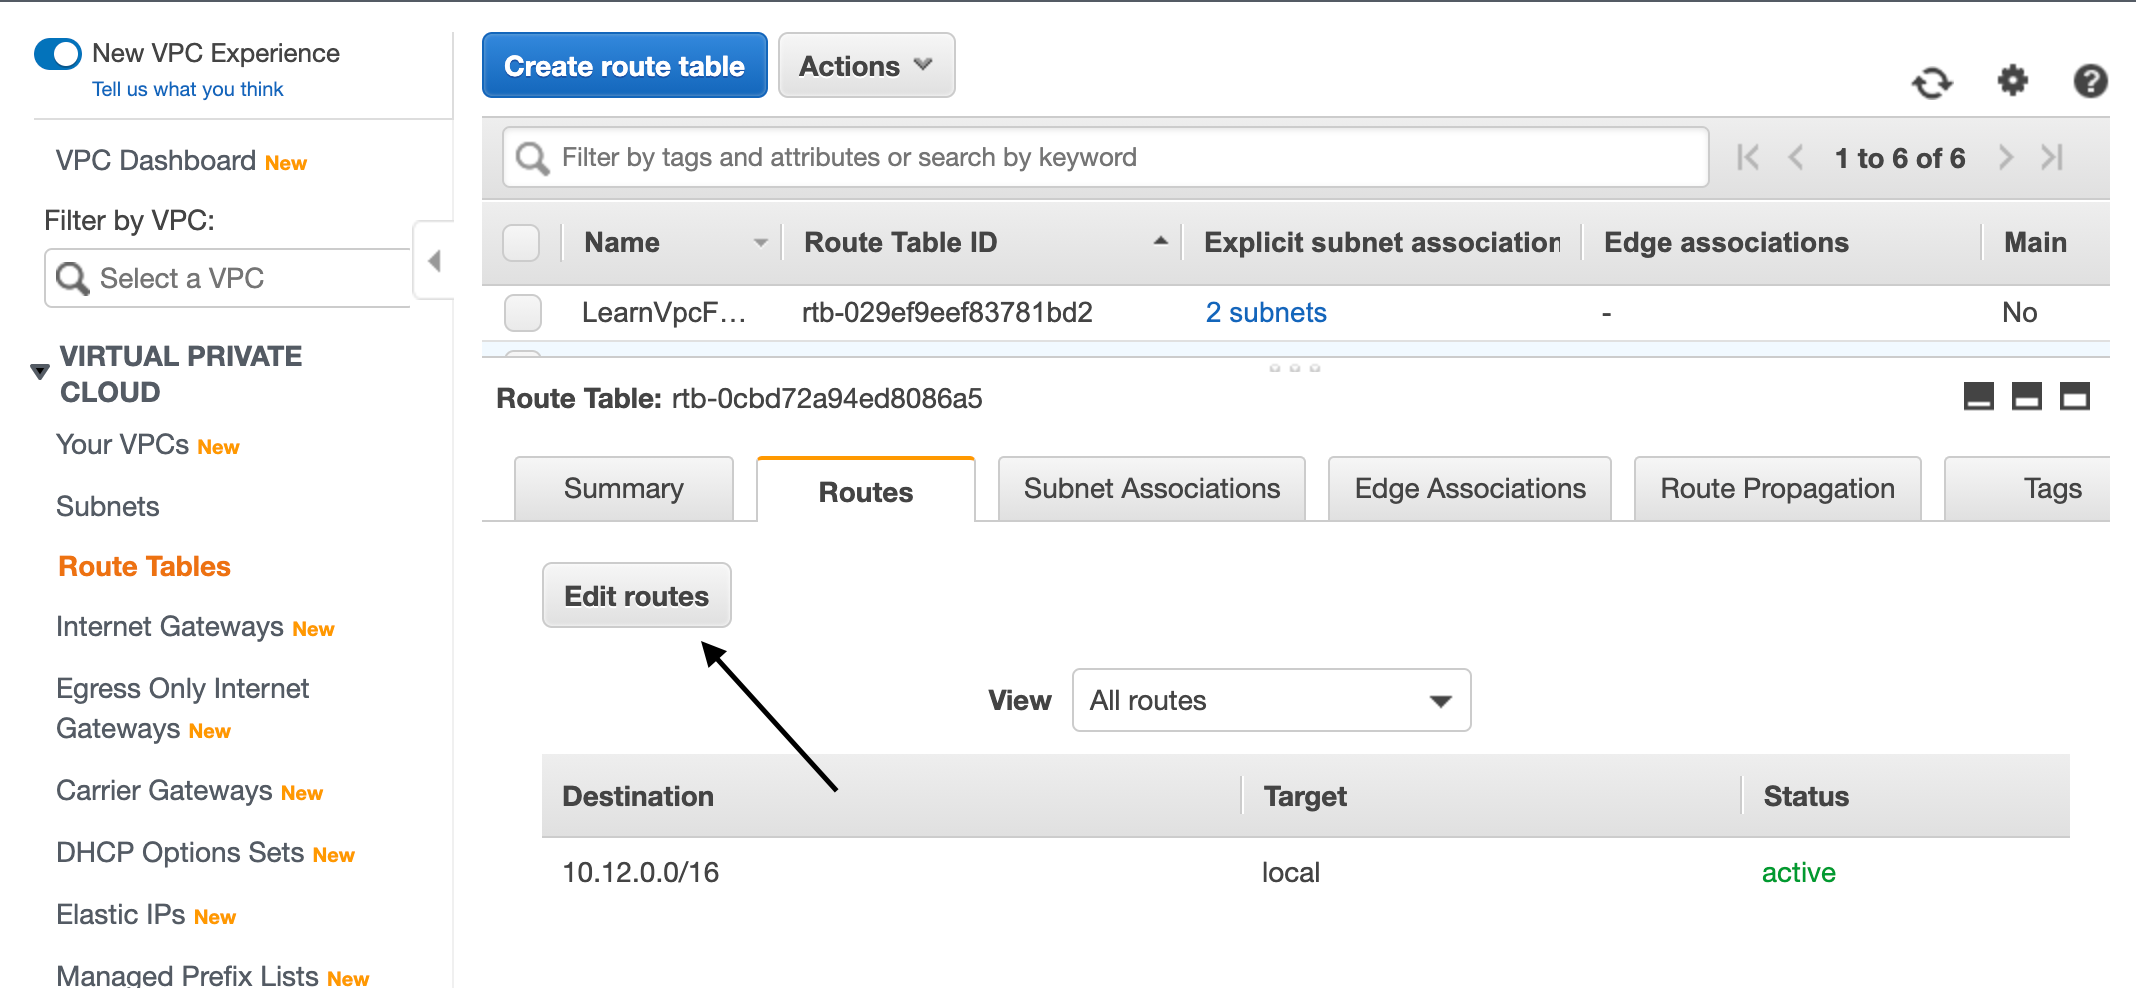
Now from the list of route tables, we select our route table, and under the tables select the tab named Subnet Associations.

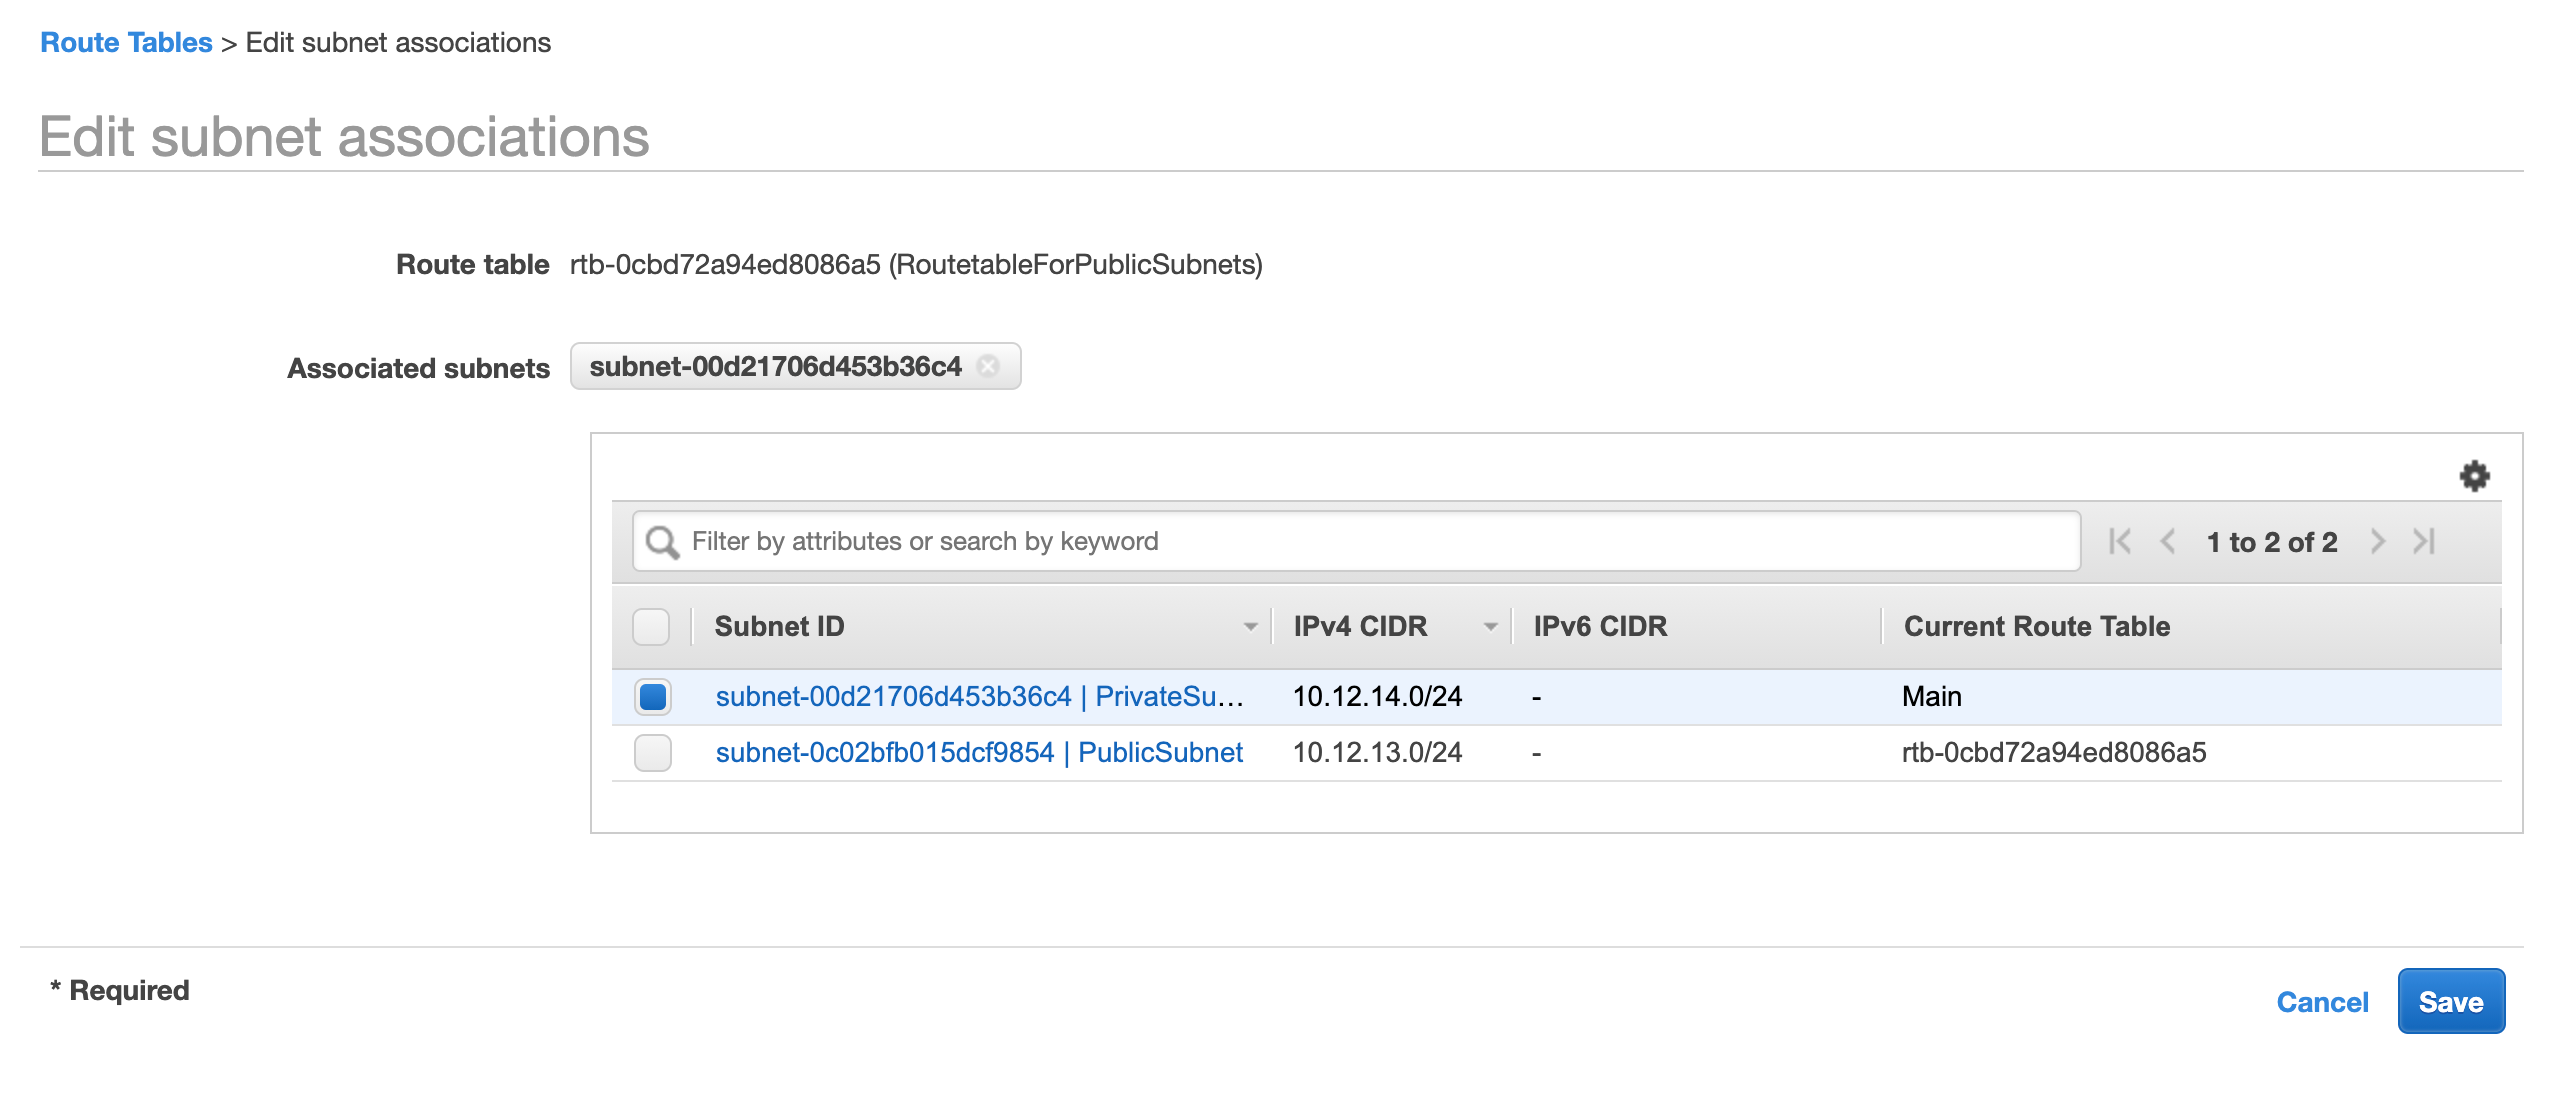
From there we click on the button named Edit Subnet Associations and add only our public subnet to this route table. Because as we said earlier we will create a separate route table for our private subnet. You can select as many subnets as you want. Click finish.
Now move to the Routes tab and select Edit Routes
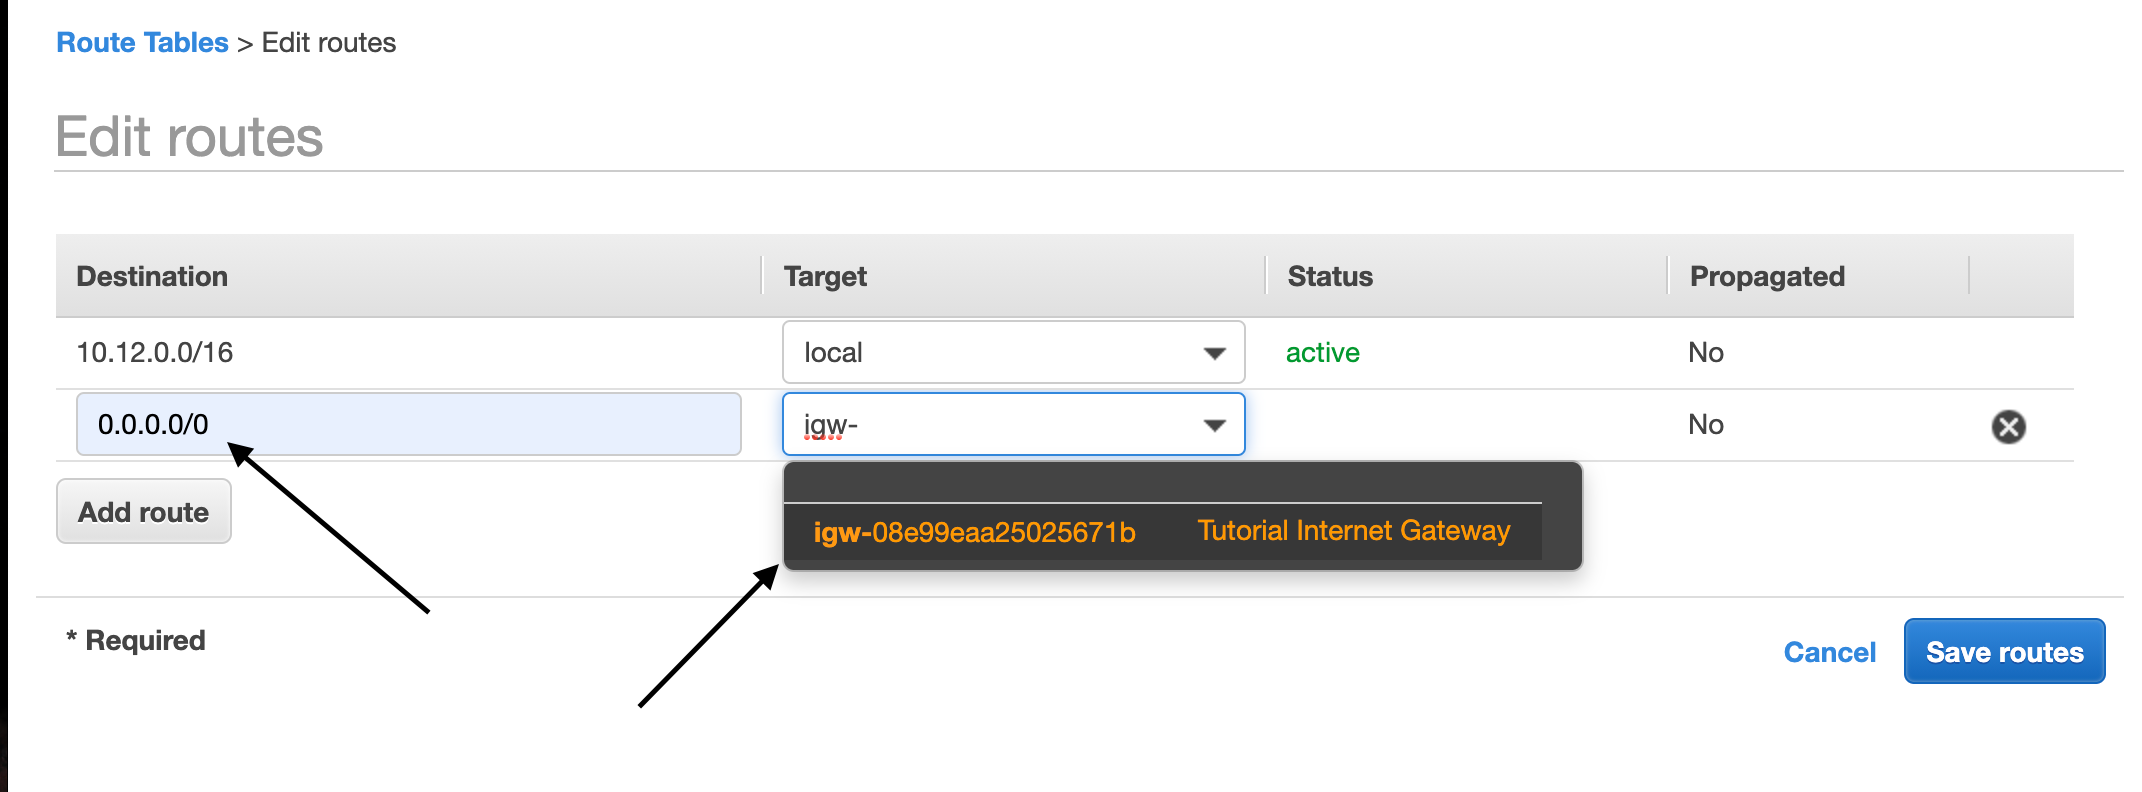
From them, click add route and add 0.0.0.0/0 which means all routes outside VPC.
We will select the internet gateway from the dropdown and save the route association.
So now we have a route-table where One of our subnets is associated.
Our route table specifies when any resource from that subnet will request for some resource having an IP address starting with 10.12. . . then it will be routed to local
Other than that the requests will be routed to Internet Gateway from where it can be accessed by the outside world.
Similarly, we will Create another route table for our private subnets.
And associate that table with our private subnet (or group of private subnets).
We don’t need to attach that table to any Internet gateway as we don’t want that subnets to be able to talk to the internet.
Creating Security Groups
Security Groups will specify the rules about how our resources inside VPC can be accessed. Now we select Security Groups from the sidebar and click on Create Security Group.
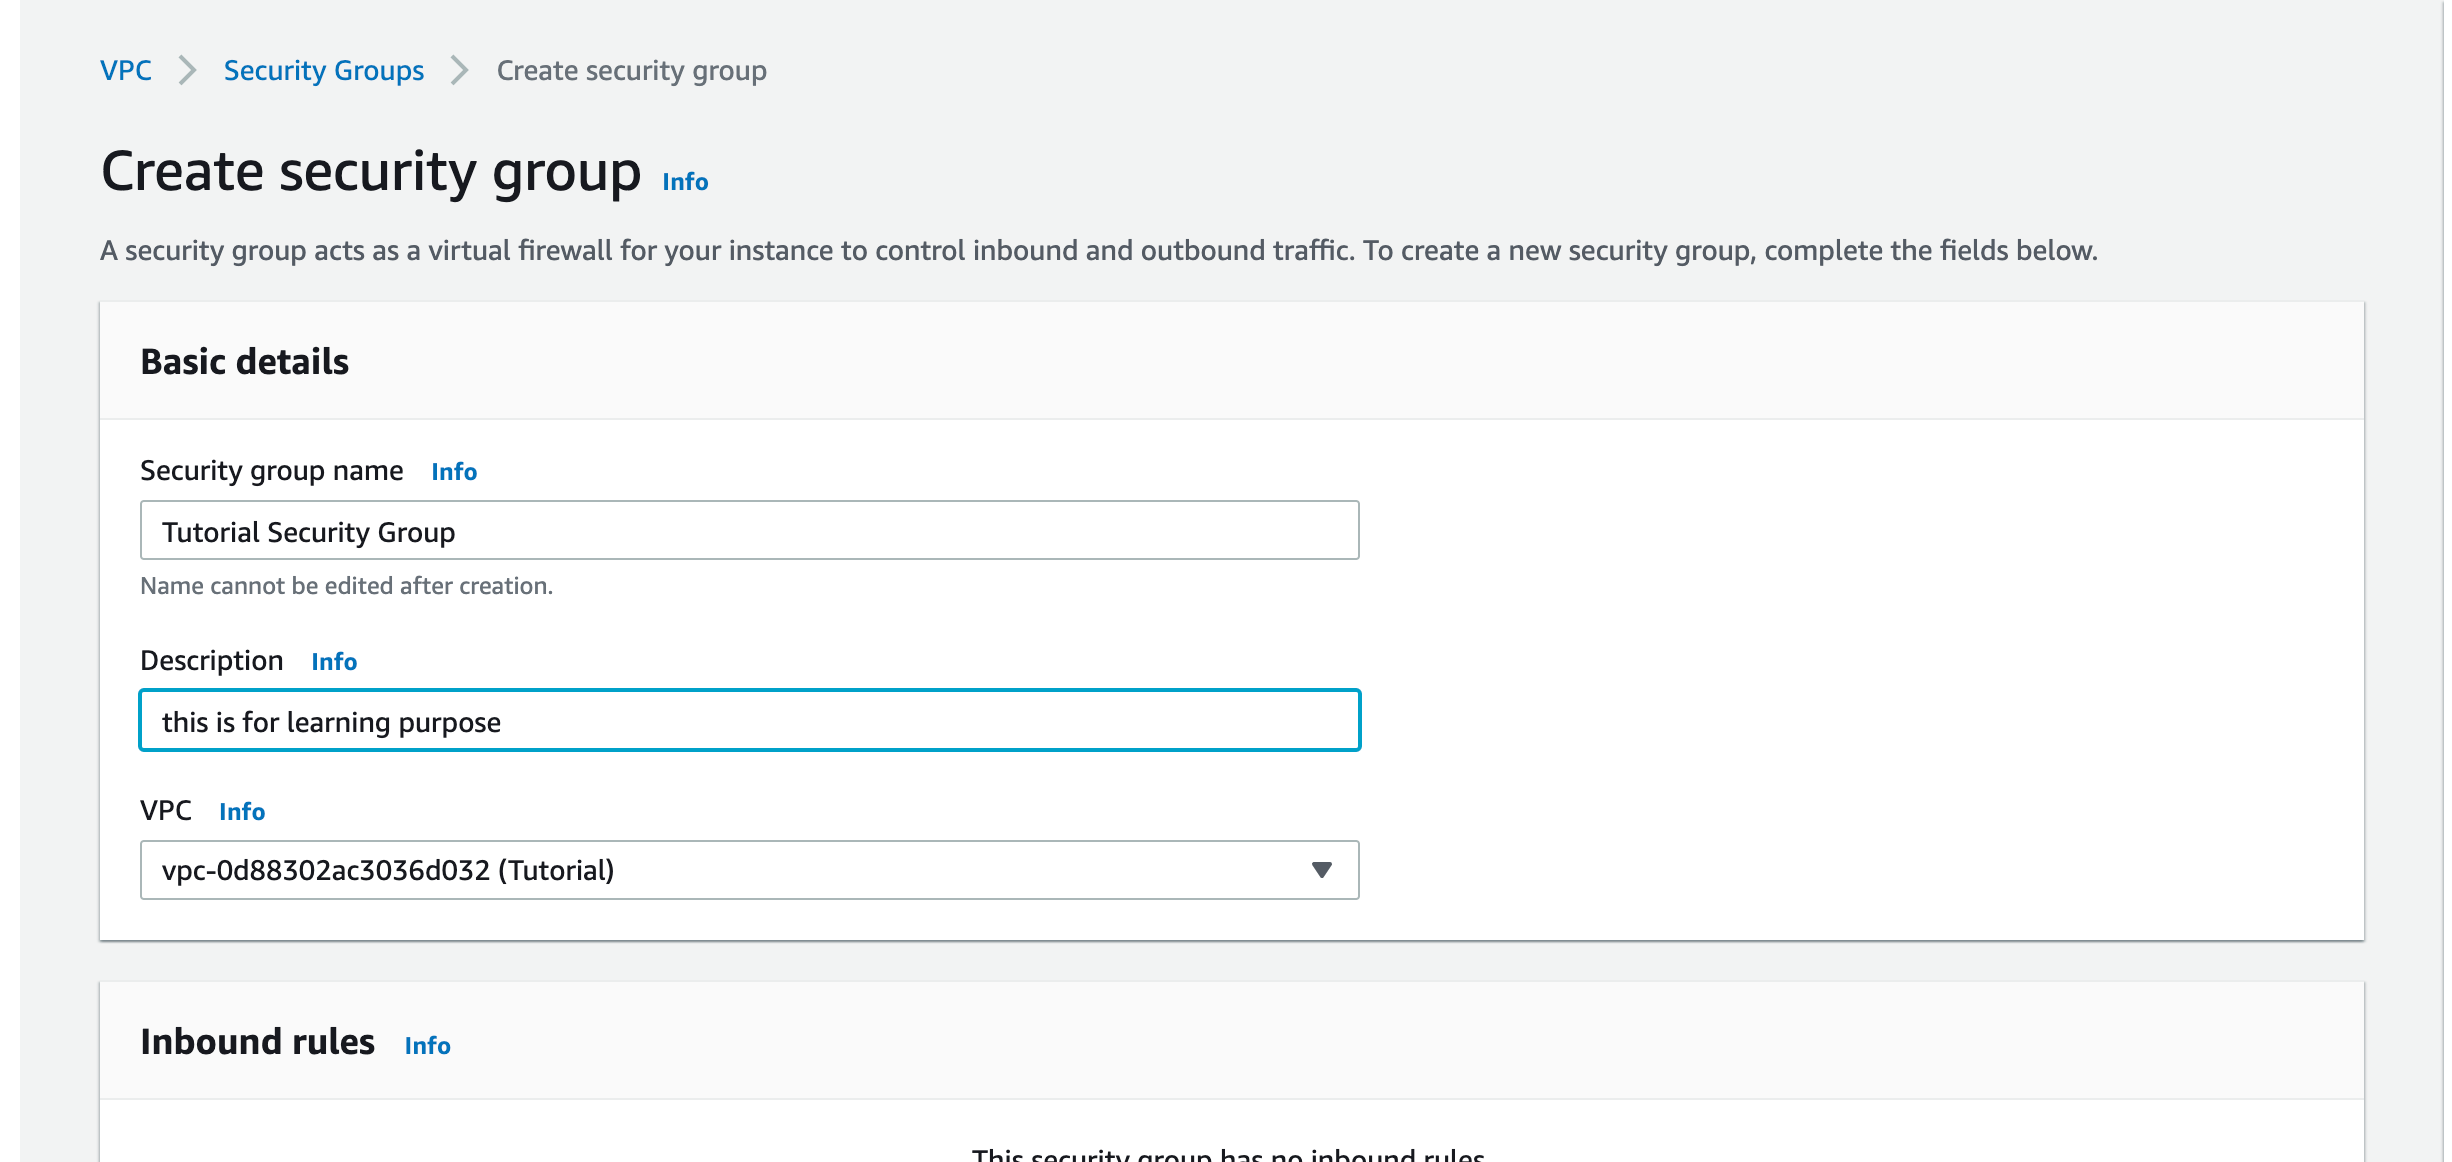
- We give it a name and select our target VPC.
Then set some Inbound Rules according to your need. Here are some examples.
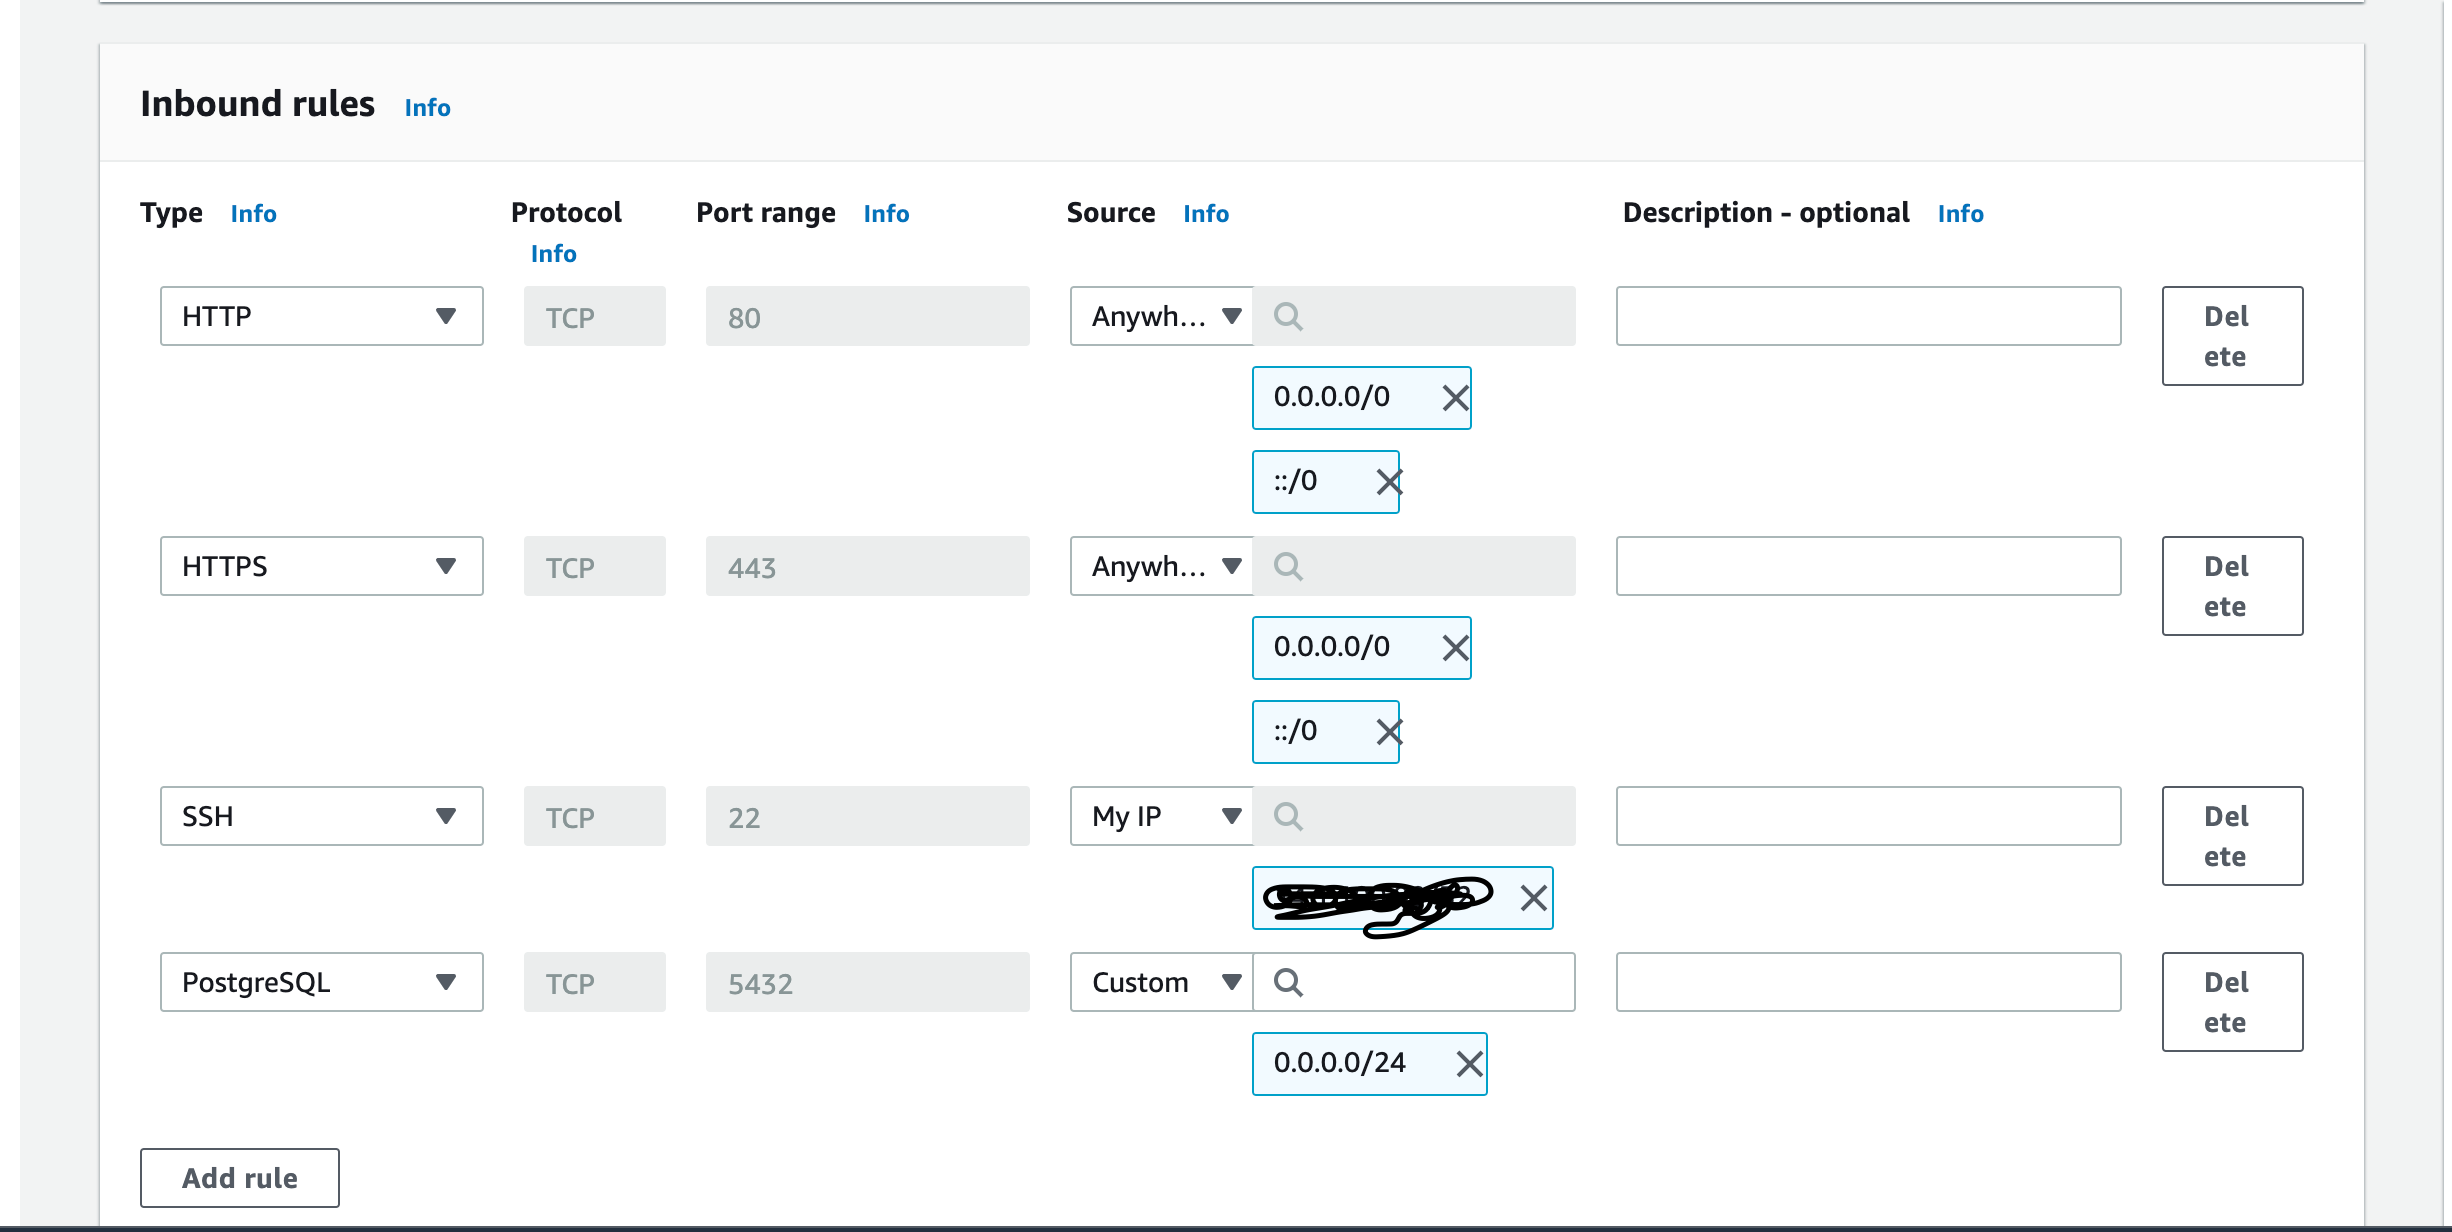
Type HTTP and Source is selected anywhere. that means anywhere from the internet we can access this VPC via HTTP protocol.
The same goes for HTTPS.
For SSH we have selected My IP. As I want to SSH to my resources only from my IP.
For PostgreSQL, I have selected Custom. We can specify which Ip addresses inside this VPC can access our Database. (It can be the IP address of your EC2 Instance where your Web application is running)
For the Outbound rule, you can do the same. and hit Create Security Group. You can edit the rules anytime.
That’s it. Now you have your own personal virtual private cloud where you can safely deploy your resources and control their access. Understanding the concepts of VPC will enable you to control the security aspects of your applications.
That’s it for today. Hope it helped :D
Get in touch with me via LinkedIn

